
Today's post is brought to you by Megean of TheIndividuality.com. You can also find this post and more help posts on her blog.
I love the simplicity of adding products to a Storenvy.com store. However, I know that it can be a little frightening to the new online shop owner. Here is a quick how-to to help you get started.
This tutorial focuses directly on adding a product. You will also need to set your shipping methods and collections (product categories). I do not cover these fully in this brief tutorial, but you can watch this video here to fully learn how to set up shipping.
Access to Shipping Rates table can be found at
https://ENTERYOURSHOP.storenvy.com/admin/shipping_classes
Access to Manage Your Collections can be found at
https://ENTERYOURSHOP.storenvy.com/admin/collections
*Blurred out sections contain information specific to my own online shop. If you have questions about these areas please feel free to contact me.
Follow this quick tip to go directly to the Products Tab of the Admin panel.


 Thank you for reading this brief (yes.. I know it got a little long
winded) tutorial. I hope it helps you list your products and generate
sales. If you have further questions, be sure to check out the help
section located on Storenvy.com. It is packed full of tips and deeper
details for setting up your site. You can find it here: support.storenvy.com
Thank you for reading this brief (yes.. I know it got a little long
winded) tutorial. I hope it helps you list your products and generate
sales. If you have further questions, be sure to check out the help
section located on Storenvy.com. It is packed full of tips and deeper
details for setting up your site. You can find it here: support.storenvy.com
I love the simplicity of adding products to a Storenvy.com store. However, I know that it can be a little frightening to the new online shop owner. Here is a quick how-to to help you get started.
This tutorial focuses directly on adding a product. You will also need to set your shipping methods and collections (product categories). I do not cover these fully in this brief tutorial, but you can watch this video here to fully learn how to set up shipping.
Access to Shipping Rates table can be found at
https://ENTERYOURSHOP.storenvy.com/admin/shipping_classes
Access to Manage Your Collections can be found at
https://ENTERYOURSHOP.storenvy.com/admin/collections
*Blurred out sections contain information specific to my own online shop. If you have questions about these areas please feel free to contact me.
Step 1
Login into your Storenvy Account and go to your dashboard.Follow this quick tip to go directly to the Products Tab of the Admin panel.

Step 2
You have now found yourself on the Products Tab of the Admin
panel. Now what? Click the "Add Product" button at the top right of your
screen. This screen also allows you to see all the products in shop as
well as a breakdown by category. If you need to add a category it will
also be done from this tab.

Step 3a
This step can be confusing for new shop owners but do not let it
overwhelm you. At this point we will enter all the information needed to
list your product. See the details below the picture.

1. Product Status
The Product Status allows you to control whether or not customers can
see your product. Switch the status to Hidden if you do not want
customers to see the product or to coming soon if it isn't quite ready
to sell.
2. Collections
Collections allow you to break your shop down even further. This is
great for organization and also to allow customers to quickly find the
item they want to buy. You can add your collections by visiting https://ENTERYOURSHOP.storenvy.com/admin/collections
3. Shipping Group
This shipping for my shop is simple, I only offer deliver through email.
This isn't the case with most shops though. Be sure to set your
Shipping Rates table before listing your product. Then select the
correct rate in this area. This will ensure that you are paid the
correct amount at checkout.
4. Social Media Tools
This section will allow you to grab the direct storenvy url for your product or to quickly share on social media sites.
5. Name & Price
Pick a short descriptive name for your product. A short name will be eye
catching and also help in search engines. You have 2 options coming up
that will allow you to describe your product in deeper detail. There
isn't much to say about the Price box :)
6. Description
This is your chance to brag about your product. Fill this box full of
details that fully allow your customer to know what they are getting.
Communicate with your customers in a tone that fits your store and this
box can also boost your branding identity. Check out the descriptions on
luanded.com for inspiration!
7. Marketplace
A major benefit of hosting your shop through Storenvy is their
marketplace. The marketplace allows your products to be found by a
variety of potential customers. List your product in an appropriate
marketplace to boost views and sales!
8. Shipping Notes
Any information you post in this area will be included in your packing slip.
9. Labels
Storenvy.com deserves a HUGE thank you for this little addition. Are you
having a sale on a item? Be sure to flag it with this area. It will add
a small "SALE" label in the corner of your products, allowing customers
to quickly find great deals. You can also use this if you are taking
pre-orders on items that are not ready to ship out. Selecting this
option will let customers know up front that there might be a delay in
the shipping of their order.
10. Tags
I love the tags section. The tags section also allows you to further
describe your product and boost your presence in the Storenvy.com search
engine. Use short description tags to make your products stand out.
Step 3b
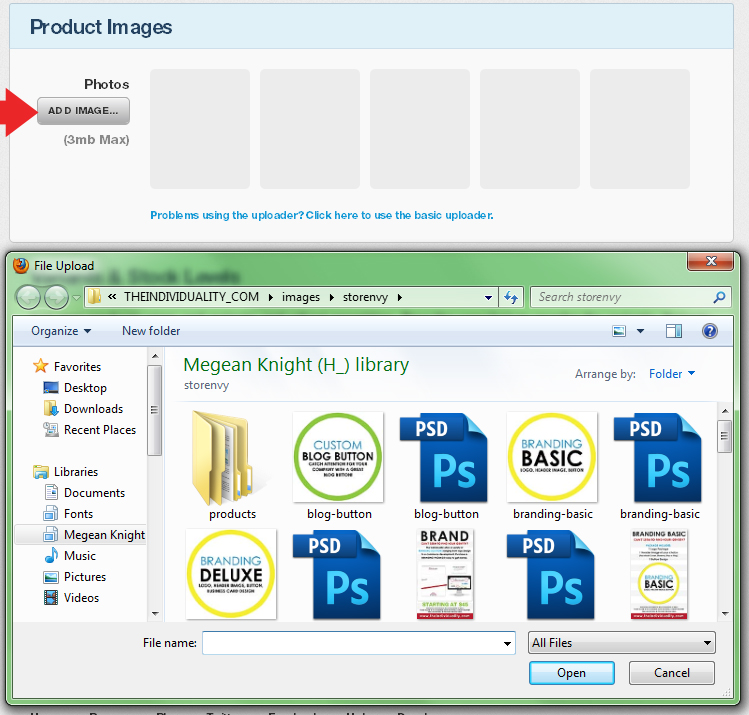
Add pictures! Customers of course want to see what they are buying. Load
this section up with pictures that fully show off what you are selling.
Great photographs make your products stand out, so be sure to only
upload photographs that put your product in its best. Grainy or blurry
pictures can give your product a negative vibe.
The process couldn't be simpler and I know you can do it! Simply click
the "ADD IMAGE..." button, locate the images on your device and click
open. The word open might be slightly different on your device, so do
not worry if it says something different but similar.
Step 3c
The final step of adding a product is setting up your stock levels and variants. Setting your stock level
will ensure that you do not make sales that you can not fulfill. Make
sure you check and double this level before you list your product.
If you product can be broken down further by allowing the customer to
make choices such as size, color, etc. use the the variants section.
Simply click the "Add Variants" button and enter the appropriate information. You can also break down your stock in the variants section.

Step 4
SAVE your product. I have labeled this Step 4 but I fully suggest frequently clicking the "Save Changes"
button located between the Tags Section & Product Images sections
to ensure you do not lose any of the details you have just entered.

Storenvy has loaded the product details page with a variety of great
tools. Which one do you find the most useful for your shop? If you could
add an additional tool, what would it be?
I figured most of it out on my own, but adding categories was pretty tricky for me to find. I thank you for this quick tutorial.
ReplyDelete