Showing posts with label Tutorials. Show all posts

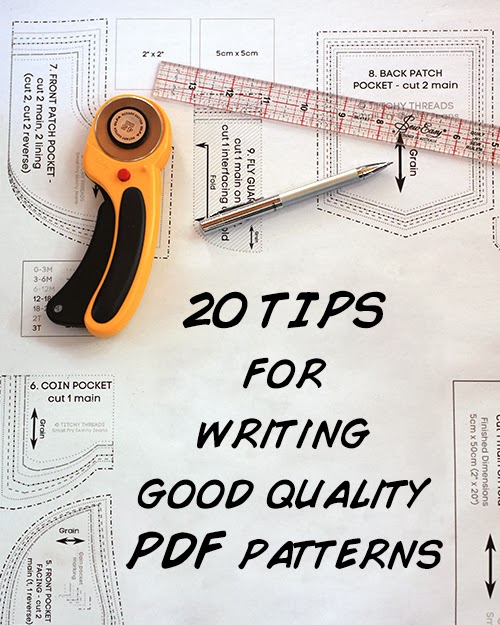
20 Tips for Writing PDF Patterns

This post originally appeared on Things for Boys. Abby is so sweet & offered to share this great advice with Daft readers, too! 


I love that there are so many indie pattern designers around these days. Modern day makers are really spoiled for choice! You can find patterns and tutorials to suit any taste to make almost anything you want.

A lot of bloggers who like to sew are turning to designing patterns as a way to explore their creativity and earn a little income from what they love to do. It’s always great to see an idea you have in your head come to life! It’s even more exciting when you see other people making them too!

I have one pattern for sale, The Big Tote Bag and another pattern in the works. I have used a lot of PDF patterns… some were great & equally, some were not so great. If you’re thinking of writing a pattern, I wanted to share my tips & experience as both a designer & consumer for creating good quality PDF patterns that are easy to follow. 

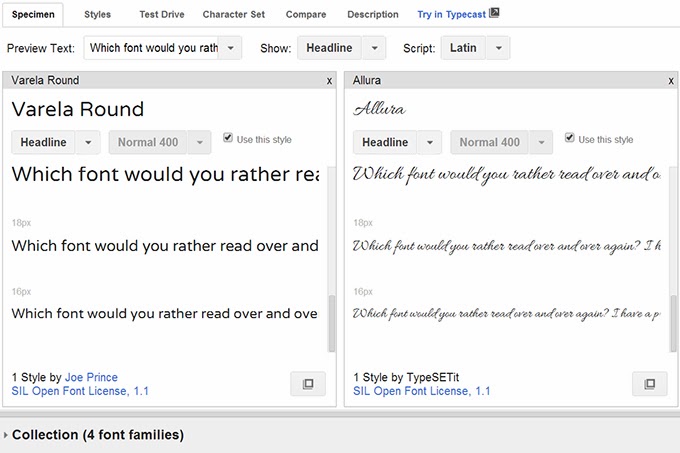
1. Use a plain, easy to read font. Save the fancy fonts for your cover page. Also, use standard left alignment. Centered text alignment can be harder to read.


2. Group your steps into logical sections. This can be tricky, but the more prototypes of your pattern you make, the better idea you get. Try to group things like all the pieces that need top stitching together so that those using your pattern won't need to be changing threads so often.

3. Number each step. If anyone ever needs to email you with a question, it’s much easier for them to say ‘I’m lost on Step 5 in Section 2′ than ‘I’m trying to insert the placket and I don’t understand the bit where you fold it through’. Numbering your pages also helps.

4. Clearly lay out each section. Keep it ordered neatly with the steps next to their photos and leave a bit of white space between each step. The white space makes it easier to read and is handy for adding annotations.

5. If you’re using abbreviations, make sure you use the full term the first time & list them in a glossary. Just because you know that RST means ‘right sides together’, it doesn’t mean every one does.

6. Include hyperlinks to techniques. These can be helpful where you don’t want to explain a technique or you feel it should already be known by the user.
7. The more prototypes of your item you make, the better your pattern will be. You may find a better way to do something the next time you make it or you may pick up a simple mistake in your instructions or pattern pieces. Also read your steps as you are sewing through & ask a friend to proof read your patterns as well. You’ll be amazed what you may notice - missing words, extra letters… all these things that our brains fill in for us, especially when we've read something so many times.


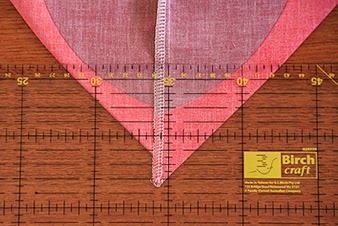
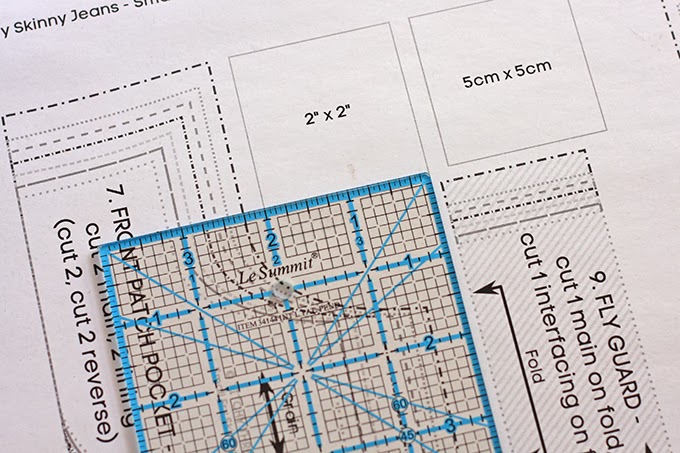
8. If your pattern includes printable pieces, make sure you include a printing test square. This square can be measured up so that the user knows the pattern has printed out the correct size. Many times I have printed out a pattern, stuck it together, cut out the paper pieces and then thought, I should check the test square, and guess what, it was wrong! Thankfully I hadn't cut into my fabric. A quick reprint, making sure no page scaling was set in the options and my pattern was perfect! If the test square wasn't there, I would have no idea if my pattern was wrong and would have wasted my time and fabric making something that was never going to fit.

9. Include full size pattern pieces. There is nothing more annoying than printing out a pattern and then realizing the pieces need to actually be printed at 200%. I don’t even know how to do that!

10. Make sure your pattern pages will print on both A4 and US Letter sized paper. These papers are different sizes and there’s nothing worse than printing it all out to notice that the sides (or tops) are chopped off and your pages are useless. Also remember that you can’t print all the way to the edge of a page. Keeping your pattern pieces within 19 x 25cm (7.5″ x 10″) should ensure that your pattern pieces will print on most printers.

11. Include grainlines and notches on your pattern pieces and a pattern layout diagram in your instructions! These are one of the things you find in the Big 4 patterns that are missing from a lot of PDF patterns - and they are so helpful!

12. Put your pattern name, logo &URL on every pattern piece if you can. It’s so frustrating finding a rogue pattern piece on the floor during a clean up and having no idea which pattern it belongs to. This is also helpful because then people can remember where they got the pattern & recommend your patterns to friends!

13. Include a large format/copy shop version of your pattern. I’m so excited that designers are starting to include these with their patterns. For just a couple of dollars you can print out the pattern at the print shop…no aligning and sticking taping of pages needed! Also, this is more personal preference, but I don’t think it’s a good idea to overlap pattern pieces. The beauty of a PDF pattern is that you can just cut the pieces out of the paper and not bother with tracing. But when the pieces are overlapped (the lines of one pattern piece go over/intersect another, think Burda Style or Ottobre) then it needs to be printed out many times or traced off the PDF).

14. Use contrasting thread when stitching for the pattern photos. It makes your seams and stitches much easier to see in any photos. I have used white thread with blue fabric in this tutorial. Much easier on the eyes than a matching thread color.

15. Choose your fabrics carefully. On some fabrics the right side and wrong side look the same, which can make your instructions confusing. Try to pick a fabric with an obvious right and wrong side. Patterns on fabric can also make photos and instructions confusing. Fine stripes can be a real problem.

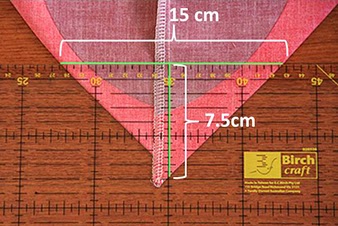
16. If you feel your photo may not be quite clear enough, feel free to add arrows, lines or notations to help get your point across. These can be done in fancy programs such as Adobe Illustrator or even just in MS Paint. You can see how much easier the image below is to understand with some measurements on it.


17. Use lot of images! Many people prefer to learn visually and including step by step images can make some confusing instructions crystal clear! You may also find that diagrams and drawings are better than pictures in some cases.

18. Test out your instructions by printing them in black and white. I also print mine out ‘2-to-a-page’ (at 50%) to make sure that they are still easy to understand when small. If they look good like this, then you know they will be easy to read if someone prints them out black and white (I only have a black and white printer at home) and also if viewing them at a reduced size on a mobile device.

19. Make your pattern cutting lines different. And not just a different color, but patterned too. Making each line style different  makes each size easily distinguishable when printed in black and white, not just colour. There’s a great example in the test square photo above.

20. Get the pattern tested - more than once! I cannot stress this enough. Your instructions make make complete sense to you, but could be very hard for someone else to understand. If your pattern is simple enough that you don’t think the pattern itself needs testing, at least have the instructions proof read by someone who knows how to sew - as well as someone who doesn't, to make sure that they are clear enough for even a novice level sew-er to understand!

21. Bonus tip! If you’re want an in depth course showing you in great detail how to create PDF patterns using Adobe Illustrator, then I can recommend Lauren’s course over at Pattern Workshop. It’s very comprehensive and Lauren has a great teaching style.

connect with Abby

Do you frequently use PDF patterns? Have you got any tips to add? Anything that drives you nuts in PDF patterns? Let's chat about it in the comments!

How to Filter Your Own Views Out of Google Analytics Reports

Today's guest post is brought to you from Toni of Little House Of Crafting.

Most shop owners visit their own store frequently when working on the design, checking listings & just to bask in it's beauty sometimes. However, visiting your own store will create inaccurate traffic data on Google Analytics, which is a great tool for data analysis in your shop. Toni from Little House of Crafting has whipped up this great tutorial for removing your own clicks from your data for accurate reporting.


You can find filters in the Admin panel of Google Analytics.


Click on the red +New Filters button.


Now you just give your filter a name - I chose "Exclude IP" - and select the filter type Custom. Then select the filter Field (IP Address) & filter pattern (your IP address). You can find your IP address using this tool here.


Make sure to put a backslash (\) in front of the periods. If your IP address is 112.41.251.122 put 112\.41\.251\.122 in the Filter Pattern box.

Hit Save and you're done!

If you use different computers make sure to make a filter for those IP addresses as well so that your Google Analytics reporting is accurate!

connect with Toni

Save Money on Postage & Keep Track of Packages in One Place with Shipping Easy

Today's guest post is brought to you by Toni from Little House Of Crafting


Of the multiple ways to print a shipping label, I've found ShippingEasy to be the most affordable and effective. It works in conjunction with a variety of different storefronts including, Etsy, Storenvy, & Ebay. The low down: 

 You can sync one ecommerce shop and purchase 50 shipping labels per month for free. 

You will need to set up an Edicia account for both First Class Mail and Expedited (Priority Mail) shipping. 

The only draw back is you must purchase a minimum of $10 worth of postage at a time through Encidia. Don't worry, you will use it!

I found ShippingEasy under the "Extras" tab on the Storenvy dashboard. After signing up for ShippingEasy and Endicia and syncing my store I was ready to go & it quickly became my favorite way to prepare orders for shipping, so I thought I would put together this little walk through to help others get started using it!

This is the order screen. You will see all of your open orders on this screen. 


Clicking on the down arrow will open up a drop down menu. From here you can create a shipment, edit the shipping weight, add notes, pick a quick ship option, etc. 


After clicking on "Create a shipment", you are taken to this screen. You will want to edit the shipping weight first. Then, choose your carrier (USPS, UPS, etc), choose your carrier service (First Class, Priority, etc.) and then the type of package. The prices will automatically adjust as you change the settings as long as you have your shipping weight updated. ShippingEasy will tell you if there is a cheaper way to ship your package based on weight and location. 

You can also change the shipping date as well. If you change your shipping date, when your purchase the shipping label, ShippingEasy will send an email to the customer letting them know that their shipment has been scheduled. I've gotten very nice feedback about this feature. My customers enjoy it very much! (You can turn off shipment notifications here.)


When you're ready to print your label click on "Add to Cart". You will be taken to the "Ready for Payment" screen. You can pay for multiple orders at a time.


After payment, it's time to print! Under "Settings" and then "Labels" you will want to customize your label printing. You can print two labels per page or you can print a label combined with the packing slip. You will want to do this for both Domestic and International labels.


After your label preferences are set, click on "Shipments" and "Ready to Print". You can print multiple labels at a time. This is particularly helpful if you choose to print two labels on a page. Click on "Print All" to print all labels. Otherwise, select the orders you would like to print, click on "Print Selected." Select what you would like to print:  Labels, Packing Slips or Labels & Packing Slips. Another window will open with the document. Ctrl+P or "File" and "Print" and you're ready to go! 

  
Other helpful information can be found by clicking on "Dashboard". Here you can see how many new orders you have today, how long ago you printed your last label, if you have any unshipped orders, your postage balances and your postage purchase history. 

 
On the left hand side of the screen, click on "Review Shipped Orders". Here you can check the tracking of orders and sort orders by destination and time. 


Also on the left hand side of the Dashboard, you can "Order Free USPS Supplies". This is where you can order Priority Mail Flat Rate envelopes and boxes.

That is a quick run down of ShippingEasy! Detailed plan and pricing information can be found here.

Will you be trying out ShippingEasy?

troubleshooting tangled thread in an embroidery machine

This guest post is from Katy of Dazzling and Dapper.

When I first started embellishing clothing with my embroidery machine, I had no clue how to care for it. I quickly learned that embroidery machines can be fickle beasts when not cleaned regularly, resulting in loose threads, looping and tangling in your bobbin thread. I wanted to share some simple maintenance tips to help tame your beast of an embroidery machine so it continues to run smoothly!

First, always check the bobbin case and thread.  Does the bobbin look loose or is there something in it? If the bobbin is not in need of being rewound or there's no obvious debris,  try a quick cleaning. 

This is how my machine (A Brother SE-400) looks before taking off the bobbin cover.


 Now let's walk through my first process for eliminating tangled threads in my embroidery machine. First step: Take off bobbin case cover.


Second: Slide off the cover, it just slide down and lift up gently


This is what it looks like after the cover is off.


Third:  Take out the bobbin holder


Gently wipe down the bobbin case & surrounding parts to collect thread bits and dust with dry q-tip, then reassemble in reverse order.


If cleaning the machine did not fix loose thread or bunching, here are a few other causes: 

Using the wrong stabilizer

Make sure that you are using the right stabilizer for the project you are doing.  

Tension
Be sure to check your embroidery machine's tension is set to the proper setting for the materials you are using. Your manual for your machine should have directions for tension adjustments. If it is a little loose then you can move the tension up one setting.  If you are seeing bobbin thread on top, it may be too tight and you will need to adjust down one setting.

If you are still having problem, it could be the tension disks. I have an easy way to help make sure that these stay free of debris and it will also help keep your machine in great shape.  These disks help keep your top thread running properly, which is extra important on an embroidery machine.  The best way to help with this is, when you are changing thread colors, simply snip the thread at the top and pull through the bottom. This is how thread is intending to go through your machine, so when you pull it back through the top, you get fibers and thread in those disks. This is one of the main causes for tension issues.

Connect with Katy

diy rainbow paper mobile

Today's tutorial is brought to you by Erin from Sugar Crumbs. Enjoy!

A few years ago, I was pregnant and feeling nesty.  Which, of course, led to an obscene amount of crafting. And when the time came for me to decorate the nursery, I knew I wanted it to be the most DIYed room of the house.

And it was. 

While I loved all of the projects that came together in that room, my absolute favorite was {and still is} my DIY Paper Mobile.


Not only was this project inexpensive but really easy too.  Want to try making one of your own?  Let’s do it!


You’re going to need a few things.
·        2 dowel rods.  I used dowels rods that were 12” long.
·        Paint and paintbrush {optional}
·        Hot glue gun and glue.
·        A small length of yarn.
·        2” circle punch.  You can use other sizes but I used a 2.”
·        Cardstock in a variety colors.
·        Fishing line
·        A sewing needle

Step One. Paint your dowels. This step is optional.  For this tutorial, I’ve chosen to leave the dowel as is.


Step 2.  Mark the center of each dowel.  Use a drop of hot glue to secure them together in an “X.”  With a length of color coordinating yarn, wrap around the cross point to secure it. Tie the ends in a knot and clip the extra yarn off.

Step 3.  Figure out what you want your mobile to look like.  The mobile I made has a center strand and 3 strands on each arm.  When I planned it out, I made a chart that looked like the picture above.  This helped me stay organized and to visualize the cascade.

Step 4. It’s time to start punching out your circles.  Save yourself some time later and arrange them in their strand orders.  This is the perfect time to pop on your favorite show and grab a drink because you’re going to be punching out a lot of circles.


Step 5. It’s time to create your mobile’s strands!  Cut a long length of fishing line and tie a knot at one end.  Use the other end of the fishing line to thread your needle.  Starting with the bottom circle, push your needle through the center of the paper. Allow it to drop down the fishing line and onto the knot you made.


Once the circle is resting on the first knot made, you’re going to make another knot. I used two fingers as a guide for how much space to leave between knots.  Push the needle through your next circle and repeat.


Repeat until you’ve completed a full strand. 
Keep doing this until you’ve made all of your strands.  Be sure to lay them down neatly and away from each other as it is easy for them to get tangled at this point.

Now for the fun part.  Let’s do the final assembly.  This part is pretty simple.


Step 6.  Leaving 3” of line between your top circle and the dowel rod, tie the line in a knot around the rod.  Apply a drop of hot glue to the top of the knot to keep it from shifting on the rod.  Clip off any extra line.  Repeat until all strands are hung.  I found it easier to start in the center and work my way out.


Step 7.  Thread the fishing line through the yarn in the cross section of the dowels and make a large loop by tying the ends together in a knot.  Hang and enjoy.


That’s all there is too it!  I’ve really enjoyed making rainbow mobiles but I think some fun ombre colors would be awesome or maybe even some patterned paper.  I hope you enjoy making your own Paper Mobile.
If you decide to make a mobile, I’d love to see it! Feel free to email pictures to me at YaySugarCrumbs@gmail.com.

Connect with Erin

adding an email sign up form to your Storenvy shop!

Today, Tanya from Mystic Eye Creations is going to walk us through adding a MailChimp email subscription form to your Storenvy shop! 

If you have iContact instead of Mailchimp, see her post: Adding iContact To Storenvy

Get Where You’re Going

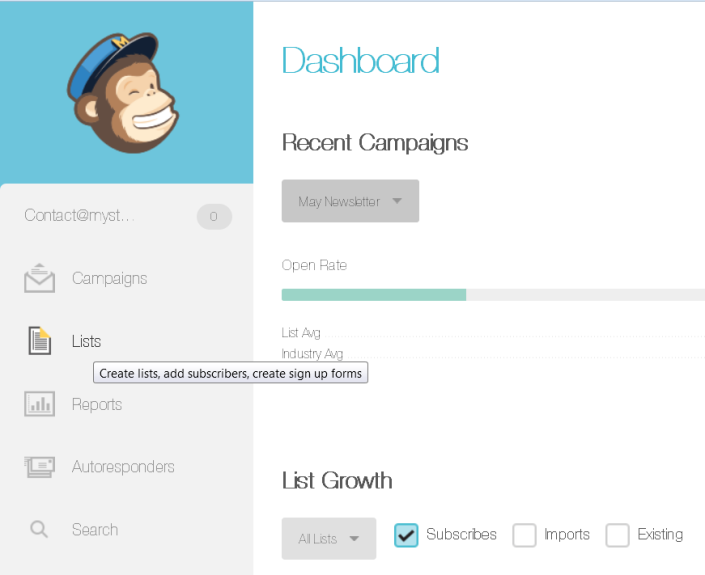
Log in to your Mailchimp dashboard. Select “Lists” from the menu – it’s the second option.

MailChimp Step 1 - the menu

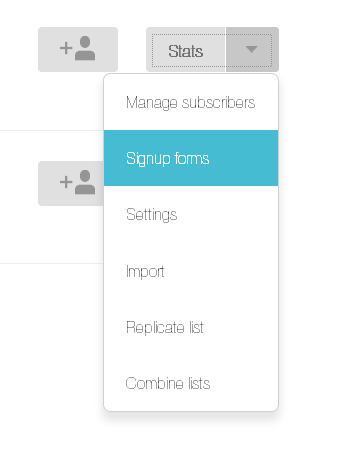
Click the arrow next to Stats and then choose “Signup forms”

Lists Buttons
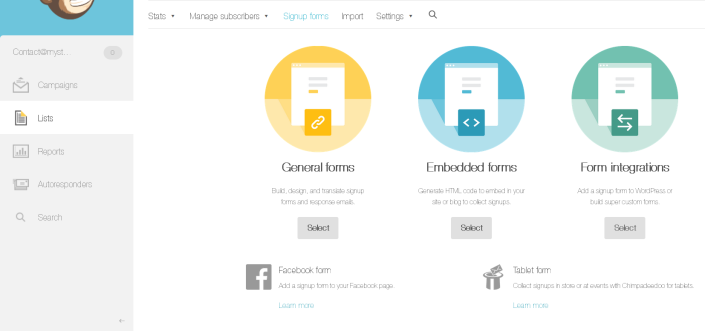
Then you get to this:


Create A Form

Lots of options, right? You will select  “Embedded forms” to work with.

Make It Up

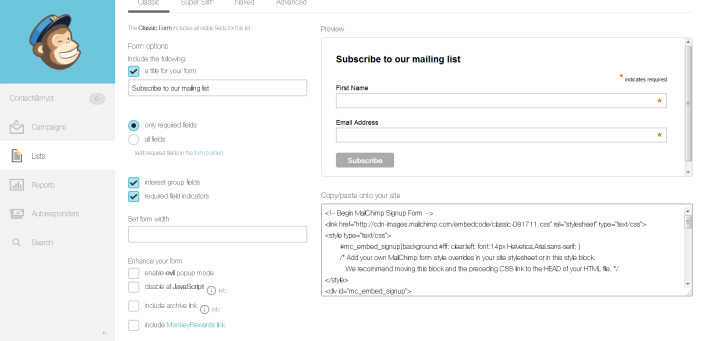
From here, you get to make your form all pretty! I use Classic, but if you’re looking to use less real estate on your page, pick Super Slim. Just remember that you can only have a required field for an email address for Super Slim to work, so you can not require subscribers to input their name if you use that option. Naked works too, but you’ll definitely have to play with CSS for that.

Design your form

Got it all prettied up and ready to install? Awesome. Don’t worry if it’s not exactly how you want it because you can tweak appearances with CSS once it’s on your Storenvy site.

Drop It In

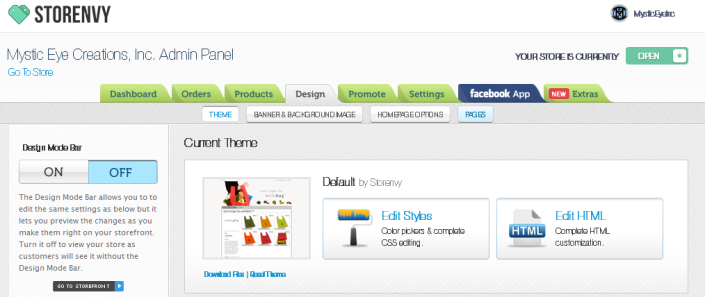
Now, select all that lovely gibberish in the lower right hand box (pictured above) and copy it. Toddle on over to Storenvy and log in. From your dashboard, select Design, then choose “Pages” or “Edit HTML” as either one brings you to the same place.

SE Design Tab

From your Page Templates list, select the type of page you want it on.

Layout will add the form to every page in your shop, like I’ve done & would recommend so each page has a call to action to join your mailing list.

 Home will add it to only the home page of your shop.

Contact or FAQ are also good places for a signup form.

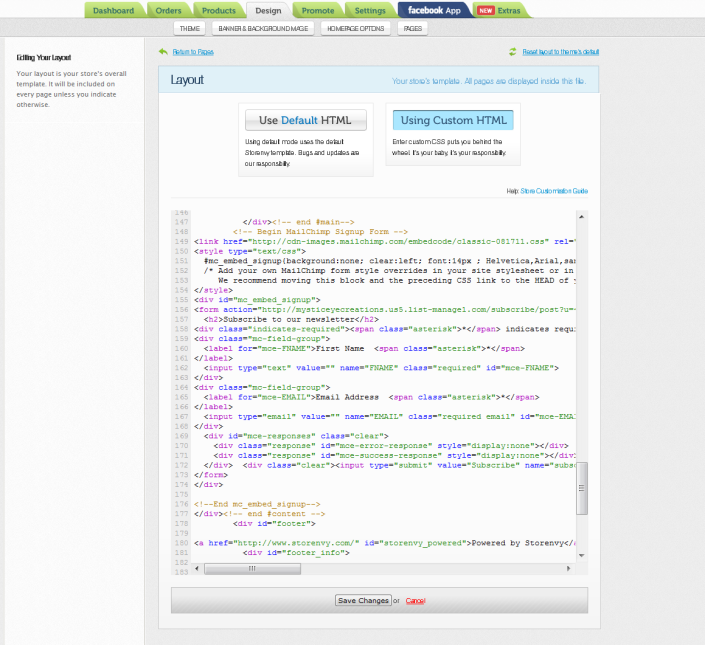
Once you've selected the template you want, choose “Using Custom HTML” on the right to show the page code. If you don’t know HTML don’t get too scared –  if you mess up there’s a reset button in the upper right so you can set it back - but if you reset you will lose any customization you have built into your Storenvy shop, so be sure to save a back up file of your code if you are worried about installing the code yourself.

Place your code where you feel it will work best. Most sections have little notes about what they are (thank you, SE team!). If you look at the picture, I’ve pasted my code immediately after the <–! end #main –> indicator so that my form is at the very bottom of each page.

Storenvy HTML

Hit Save

That’s it. Really. Unless you want to go to the CSS and add some fancy stuff there. You don’t need to, though. Especially if you really gussied it up from the MailChimp panel.

Enjoy! If you have any questions hit Tanya up on Facebook or Twitter!

make a ribbon zinnia


The Zinnia Ribbon flower is one of my favorites, but I don't make it very often. It can be quite time consuming, but it makes a fun, unique flower. I find it easiest to use a 7/8" or 1" wide ribbon, but other sizes can be used as well.


Starting at the bottom corner, make a running stitch at a 45* angle. Count the number of stitches it takes to make the first pass. (I like to use an even number). You will want to use the same number of stitches for each pass so that your petals all look even.


Once you get to the edge, make a 90* turn and stitch to the next edge. (If you like, you can draw lines at 90* angles down the strip (zig zag). I skipped this step and just eyeballed the angle while I stitched.) After making a few passes you can start pulling the thread taut and make the ruched petals.


When your ruched ribbon is as long as you want it, knot & cut the thread. Next, start curling the ribbon in a circle to form a flower. You can secure it with thread, sewing it in place. Or, you can use a hot glue gun to glue the flower down to a piece of felt.


The finished flower should look like this. It can be attached to a headband or clip to wear as a hair accessory, or put on a lapel pin, or to adorn a handbag. I used a blue zinnia in this hair fascinator and love the added texture it brings.

April Showers fascinator
If you make a ruched ribbon zinnia, I would love to see your work! Let me know what you think of the tutorial too.

Today's guest post is brought to you by Melanie of Violet's Buds! 
Violet's Buds
facebook/twitter/blog

diy upcycled hair accessory display


  Today's guest post is brought to you by Melanie from Violet's Buds.

Last summer, I attended Strawberry Swing Indie Craft Fair with Violet's Buds accessories. After attending Zeleny in the spring, I knew I needed to do something to improve my setup. I wanted to have a cohesive display without spending a lot of money, and make it "mine."


I love going to garage sales (or garage sale-ing as we call it) and thrift stores. I also find it important to reuse & re-purpose items as much as possible. This summer I came across many good wooden photo frames priced between $.10 to $1.00. Some frames didn't have a back, most didn't have glass, but that was fine with me!
 

I started by painting each of the frames an-off white color, using Craftsmart "Vanilla" acrylic paint. Each frame took 2 coats (with drying time in between), but I wanted sort of a worn, weathered look so I wasn't too particular about getting the coats even. A couple frames were too perfect-looking so I took a nail file to them in a few spots.

While the frames were drying, I worked on the backing for the inside of the frame. Using fabrics I had on hand, I covered the cardboard insert for each frame. (Any frame that came without the insert, I measured & cut one from our cardboard recycling stash). To easily cover the cardboard, I cut the fabric at least .5 inch wider on each side than the board. Once the fabric is cut, it is really important to iron it! You won't be able to get the wrinkles out once you secure it to the cardboard.


Next, I took the wrinkle-free fabric, laid it wrong side up, and placed the cardboard on top. I applied a bead of hot glue to the cardboard and secured the fabric to the board all the way around, pulling the fabric taut as I went. Then using scrap ribbon, lace, & bias tape I made the "hangers" that my hair accessories would clip to. I measured & used hot glue to secure each strip to the back of the cardboard.


Once the painted frame dried, & the cardboard insert was covered, I assembled the frames. I had to improvise with a few of the frames missing the backs and secured the cardboard insert with packing tape. Finally, I clipped the hair accessories to the holder strips in each frame.


I was very pleased with how the display came together, and I had fun crafting the display too!


These frame displays would work well as hair bow holders in a little girl's room. The frame could be painted any color, then using fabric to match her decor.

I'd love to hear what you think, and if you use this tutorial feel free to tweet pictures of your projects to @daft_crafts or @violetsbuds - we would love to see them!