Showing posts with label storenvy. Show all posts

How to Add Custom Blog, Gallery & Other Pages to Storenvy

 Did you know Storenvy allows the ability to add pages to your store front? I have added an About page to my shop that you can check out to get an idea what the new pages you can add to your shop will look like!

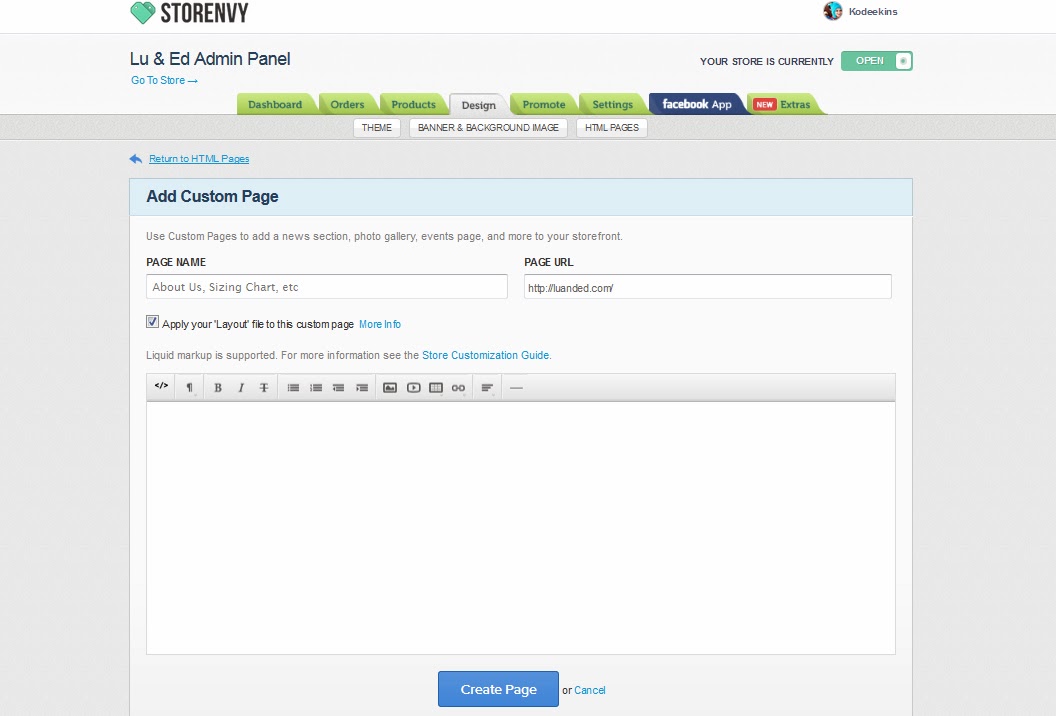
You can embed your blog, Instagram feed, create a photo gallery, sizing chart, and so much more! Just log into Storenvy.com and head to your admin panel, then click "Design". Then click "HTML pages".


Next, you will want to click on "+Add a custom page".


This will open a blank page that you can title, and fill with text and images to create stunning About Pages, sizing charts, photo galleries, and more - or with a little coding knowledge you can dive into the HTML and embed your blog & other feeds. Below, I have broken down some of the features available & how to use them for anyone who may need help! :)


To add images:

Click the graphic in the tool bar that looks like a small photo. It will open a pop up box to insert the photo URL. You cannot upload photos directly to be hosted on your custom pages, so they will need to be posted elsewhere, Facebook, your blog, Flickr, etc. Simply right click the image where it is hosted and click "Copy Image Location". Then paste that text into the image URL box and click insert. Viola! You've added a photo!


To add video: 

The video icon is directly to the right of the photo icon. Click it, and you can embed videos. Again, you can't directly upload them to this page, but you can easily upload them to Youtube then embed the code from there into your custom page.

To add sizing charts, color charts, etc:

The button to the right of the video button is a "table" button. You can use it to create charts, which you can use for color or sizing charts. Click the box and chose how many rows and columns you need, then just type in your information! Super easy!


To make links clicky: 

Make your about pages and more look snazzy by embedding the links rather than copying the URL into the post (IE, my shop vs http://luanded.com). To do this, type your text as you want it to appear, then highlight the part you want to link - for example, if you donate a portion of your sales to a Susan G. Komen, you would highlight the charity name, then click the icon that looks like a chain link. Type in the URL there and click insert, and ta-da! You have inserted a link! :)


For directions to embed your blog in a custom HTML page, follow these directions posted by Storenvy.

I hope this mini walk through was helpful! :)


What do you think of the new Storenvy pages? What will you be using them for? 

It's not Storenvy vs Etsy

There seems to be some line drawn where handmade people think you have to either sell on Storenvy OR Etsy.

Total myth.

You can sell on both. They work well together. And it's easy. Storenvy never set out to compete with Etsy. They just wanted to create a place where indie artists and creative entrepreneurs could open a free online store and enjoy the benefits of being part of a marketplace full of other creatives!

Here is some blunt perspective on this non-existent Etsy vs Storenvy war and how they can actually work hand in hand:

Say you are already selling on Etsy and you want to expand to reach a new market and build your own branding identity by having a fully customized shop, but you're all like "Ugh, I have eleventy billion items listed on Etsy, it's just not worth it to me to spend time setting up on another site" you can start jumping for joy right now because Tonka Park has built an Etsy to Storenvy importer that quickly and easily copies over listings, product photos, descriptions, tags and prices. Pretty awesome, right?

And if you are worried about selling an item on Storenvy that you have listed on Etsy and then that same item selling on Etsy and you're all like "Oh noooooooo, what do I do if I double sell?!" stop worrying and set up an account with Stitch Labs to easily, seamlessly manage inventory on both platforms. When you sell an item from Storenvy, the identical item will be automatically removed from your Etsy shop. Boom. It's that simple. Check out their Storenvy and Etsy integration to learn more.

Then there's the people who think Storenvy doesn't have a place for handmade shops - not true, they have an entire marketplace set up just for handmade shops which makes up a huge chunk of their total number of shops. And I have heard "But I see resellers" - well, yeah. I see resellers on Etsy too, but if you're already selling there, I don't quite understand that concern regarding Storenvy's handmade market, you know? I think as artists all we can do is create beautiful, quality wares - because realistically, true artists are not competing with resellers. But that's a whole different topic altogether. 

And of course there's the concern you can't print shipping labels straight from Storenvy like you can from Etsy. Not directly from Storenvy, but they integrated with Shipstation so their users can print shipping labels for Storenvy orders quickly and easily!

So what have we learned?

It's easy to have both Etsy and Storenvy shops. There's not battle between the two sites. Etsy provides you with a great audience and buyer visibility whereas Storenvy provides you with the ability to create a brand for yourself by allowing total shop customization and the ability to domain host (so you can be yourshop . com). Storenvy is also backed by a powerful search engine within it's marketplace that ranks products in real time popularity base on recency of listing, Envies, and purchases so you also reap the benefit of your products reaching a new audience in a much less saturated market, allowing your products to really stand out and evolve.

There's one thing I want to say though - I've helped a lot of people set up a second shop on Storenvy.com and usually, three months later they say it's not working for them. Why? You have to promote it as much as you promote your Etsy shop. You can't just open shop, import products and leave it - you have to market it, talk about, drive your clients to or else how can you expect it to be a success?

What do you think? Will you be taking Storenvy for a test drive?

How to use the rating feature on Storenvy

Did you know Storenvy.com has a rating system? Yup, Storenvy automatically sends out an email two weeks after people make a purchase, asking them to rate your store, but ratings for purchases can also be given through Storenvy if the buyer was logged in as a member when they made their purchase!

Here's how to leave a rating:

Go to Storenvy.com and log in. In the right hand corner, hover over your profile picture and chose "orders".

Once you are on your orders page, simply click Rate This Store.


Once there, you can rate a shop on it's on-time shipping, product quality and customer service, and also write a review.


Then press submit! Super quick and easy.

At this time, ratings are not able to be veiwed by the public. However, shops that consistently receive excellent feedback will earn a badge for their shop that will be displayed in the Storenvy marketplace, giving them at a glance recognition for offering superb products and excellent customer service. I think that's pretty spiffy! 

To view your ratings, just hover over your shop panel in the top right & click "ratings".


You will be able to see all of your ratings in detail on this page, as well as comments people included with their ratings! 


For more information on the rating system, visit Storenvy's blog for all the deets!  

Feel free to share this post with your fans via social media to help walk them through the process so you can begin collecting ratings for your store! 

Save Money on Postage & Keep Track of Packages in One Place with Shipping Easy

Today's guest post is brought to you by Toni from Little House Of Crafting


Of the multiple ways to print a shipping label, I've found ShippingEasy to be the most affordable and effective. It works in conjunction with a variety of different storefronts including, Etsy, Storenvy, & Ebay. The low down: 

 You can sync one ecommerce shop and purchase 50 shipping labels per month for free. 

You will need to set up an Edicia account for both First Class Mail and Expedited (Priority Mail) shipping. 

The only draw back is you must purchase a minimum of $10 worth of postage at a time through Encidia. Don't worry, you will use it!

I found ShippingEasy under the "Extras" tab on the Storenvy dashboard. After signing up for ShippingEasy and Endicia and syncing my store I was ready to go & it quickly became my favorite way to prepare orders for shipping, so I thought I would put together this little walk through to help others get started using it!

This is the order screen. You will see all of your open orders on this screen. 


Clicking on the down arrow will open up a drop down menu. From here you can create a shipment, edit the shipping weight, add notes, pick a quick ship option, etc. 


After clicking on "Create a shipment", you are taken to this screen. You will want to edit the shipping weight first. Then, choose your carrier (USPS, UPS, etc), choose your carrier service (First Class, Priority, etc.) and then the type of package. The prices will automatically adjust as you change the settings as long as you have your shipping weight updated. ShippingEasy will tell you if there is a cheaper way to ship your package based on weight and location. 

You can also change the shipping date as well. If you change your shipping date, when your purchase the shipping label, ShippingEasy will send an email to the customer letting them know that their shipment has been scheduled. I've gotten very nice feedback about this feature. My customers enjoy it very much! (You can turn off shipment notifications here.)


When you're ready to print your label click on "Add to Cart". You will be taken to the "Ready for Payment" screen. You can pay for multiple orders at a time.


After payment, it's time to print! Under "Settings" and then "Labels" you will want to customize your label printing. You can print two labels per page or you can print a label combined with the packing slip. You will want to do this for both Domestic and International labels.


After your label preferences are set, click on "Shipments" and "Ready to Print". You can print multiple labels at a time. This is particularly helpful if you choose to print two labels on a page. Click on "Print All" to print all labels. Otherwise, select the orders you would like to print, click on "Print Selected." Select what you would like to print:  Labels, Packing Slips or Labels & Packing Slips. Another window will open with the document. Ctrl+P or "File" and "Print" and you're ready to go! 

  
Other helpful information can be found by clicking on "Dashboard". Here you can see how many new orders you have today, how long ago you printed your last label, if you have any unshipped orders, your postage balances and your postage purchase history. 

 
On the left hand side of the screen, click on "Review Shipped Orders". Here you can check the tracking of orders and sort orders by destination and time. 


Also on the left hand side of the Dashboard, you can "Order Free USPS Supplies". This is where you can order Priority Mail Flat Rate envelopes and boxes.

That is a quick run down of ShippingEasy! Detailed plan and pricing information can be found here.

Will you be trying out ShippingEasy?

How to Set Up Text Message Notifications for Sales on Storenvy

Sad you don't hear a cha-ching when you get a sale on Storenvy? Well, now you can! (Mine plays Money, That's What I Want by Flying Lizzards, but hey, whatever alert tone you want.)

It's super easy to set up, so what are you waiting on? Go to your Storenvy admin panel>Extras & scroll down until you see Zapier. Click over to it & set up an account - it's totally free! You can not only set up text alerts but also capture emails from purchases to add to your newsletter & many more awesome things! Peruse the site & all it's awesome functions, it's really rad! 

Once your account is all set up, let's make a new Zap! 

Step 1: You will chose Storenvy as the first platform (You set this up in your settings when setting up an account or by clicking your profile in the right hand corner & selecting Connected Accounts), and the trigger will be New Order. 

The second platform you choose is Phone & the action is Send SMS. 


Step 2: Test your Storenvy account to make sure it's linked properly & transmitting info to Zapier!

Step 3: Input your phone number that you want to send the SMS messages to. 

Step 4: Set when you want this action to happen - you can set filters but we don't need to that since we are just setting up a text notification for sales.

Step 5: Type in the message you want to get.


Step 6: Send yourself some sample texts. Then save the number to your phone as whatever you wish & add the custom tone so you get a notification of new sales! 

Step 7: Turn it on! 


It's that easy peasy! 

Will you be using mobile notifications for Storenvy sales?

Setting up shipping on Storenvy

This post has moved! View the updated version here.

adding an email sign up form to your Storenvy shop!

Today, Tanya from Mystic Eye Creations is going to walk us through adding a MailChimp email subscription form to your Storenvy shop! 

If you have iContact instead of Mailchimp, see her post: Adding iContact To Storenvy

Get Where You’re Going

Log in to your Mailchimp dashboard. Select “Lists” from the menu – it’s the second option.

MailChimp Step 1 - the menu

Click the arrow next to Stats and then choose “Signup forms”

Lists Buttons
Then you get to this:


Create A Form

Lots of options, right? You will select  “Embedded forms” to work with.

Make It Up

From here, you get to make your form all pretty! I use Classic, but if you’re looking to use less real estate on your page, pick Super Slim. Just remember that you can only have a required field for an email address for Super Slim to work, so you can not require subscribers to input their name if you use that option. Naked works too, but you’ll definitely have to play with CSS for that.

Design your form

Got it all prettied up and ready to install? Awesome. Don’t worry if it’s not exactly how you want it because you can tweak appearances with CSS once it’s on your Storenvy site.

Drop It In

Now, select all that lovely gibberish in the lower right hand box (pictured above) and copy it. Toddle on over to Storenvy and log in. From your dashboard, select Design, then choose “Pages” or “Edit HTML” as either one brings you to the same place.

SE Design Tab

From your Page Templates list, select the type of page you want it on.

Layout will add the form to every page in your shop, like I’ve done & would recommend so each page has a call to action to join your mailing list.

 Home will add it to only the home page of your shop.

Contact or FAQ are also good places for a signup form.

Once you've selected the template you want, choose “Using Custom HTML” on the right to show the page code. If you don’t know HTML don’t get too scared –  if you mess up there’s a reset button in the upper right so you can set it back - but if you reset you will lose any customization you have built into your Storenvy shop, so be sure to save a back up file of your code if you are worried about installing the code yourself.

Place your code where you feel it will work best. Most sections have little notes about what they are (thank you, SE team!). If you look at the picture, I’ve pasted my code immediately after the <–! end #main –> indicator so that my form is at the very bottom of each page.

Storenvy HTML

Hit Save

That’s it. Really. Unless you want to go to the CSS and add some fancy stuff there. You don’t need to, though. Especially if you really gussied it up from the MailChimp panel.

Enjoy! If you have any questions hit Tanya up on Facebook or Twitter!

storenvy tutorial: add a commenting system to collect reviews!

Today's guest post is brought to you by Tanya of Mystic Eye Creations. She is cross posting her new most popular post on her blog, How to Add Disqus Commenting System to your Storenvy Shop. 

Today, class, we'll learn to add Disqus commenting system to our shop! See it in action here: Large Ornament Review It's pretty easy to install and maintenance/moderation is just as easy, if not more so. The only trouble I've had so far is that it's difficult to customize the appearance of it via CSS. That's not a huge deal for me, as they offer a color scheme that works with my shop; for others it may be trouble.

First step, sign yourself up! On www.disqus.com you need to select the "For Websites" link, then "Sign Up Free", and follow the prompts. It took me less than 5 minutes, even with a tubby kitty trying to lie on my keyboard.

  Disqus Setup

 Once that's done they ask you to select what platform you would like code for. You'll want to pick the "Universal Code" option. It is worth noting, though, that you can integrate this with just about anything on the web! Spiffy.


  Disqus Choose Platform

 Awesome 'possum. Now, copy that code shown in the first box. Don't worry about trying to customize the appearance first, unless you like playing with java script; that's after this.

  Disqus Code

 Open a new browser tab or window and get to your Storenvy dashboard. (In case you didn't know, you can type Yourstorename.storenvy.com/admin to get there!) Then go to the Design tab, pick Pages or Edit HTML, and select the template you want. I've chosen the Product template, so people can leave individual product reviews or questions, like you see on the big box stores' websites. Place your code where you would like it to appear. Keep in mind that it will expand to the width of whatever div it is in. (Mine is placed at the very bottom, outside of all other containers, so that it fills the product page width.) Go ahead and play with it, I'll wait here.

   Disqus Code Install

 Back? Great. Now, let's play with the looks of it a bit. Go back to your Disqus admin panel, and go to the Settings tab at the far right.

 Disqus Appearance

 This is where you select a light or dark color scheme for your comments tool. It's default setting is "auto" so it determines the scheme for you. My background is a gradient, though, so it got it wrong - I'm assuming those with a picture background may have the same issue. If it doesn't look right in your shop, change the setting here. Selecting dark makes all text white, selecting light makes all text black. Then, select "Advanced" to set the default graphic when a guest (someone without a Disqus account) posts. Mine is our shop button, but you could pick anything, or leave the generic anonymous graphic they supply.

  Disqus Avatar

Now let's add some filters. Chances are you won't want a bunch of cussing, or even people advertising their own shops, to show up in your store. Still under Settings, select the filters tab. Here you can add words to block - I just copy and pasted their suggested list of words. You can also set it do posts with links need approval from you before they show. There's a checkbox for that just below. Don't forget to hit save!

  Disqus Filters

Lastly, lets go over to the "Discovery" tab. Discovery is ads and additional traffic, but it does clutter your page a bit. Feel free to leave this as-is or adjust to your preferences. I've removed it all and kept it to the "Just Comments" option, and if you'd like to do that too, don't forget to uncheck "Affiliate links" below.

  Disqus Ads


See? Nothin' to it. Feel free to leave questions in the comments here!

storenvy.com tutorial: remove "pin it" feature

This post was written by Megean and originally posted on her blog. She has generously offered to share this amazing tutorial for removing the Pin It button from custom Storenvy shops with our audience! 

While most people love pinterest, not all small businesses are feeling the love. This is especially true for small handmade businesses who do not want their products pinned. This is entirely up to each company and I fully respect their reasoning behind the choice.

I LOVE Storenvy.com and all the features that it includes. Unfortunately, I have had a couple of clients request the "pin it" button be removed from their custom product pages. Removing the "pin it" feature is completed in 5 EASY steps and only involves a quick glance into the coding of your site.

As always, when accessing the coding behind your site, remember to be careful. The smallest mistake can completely break a site. So please, follow the instructions exactly.

STEP 1:
Login into your Storenvy.com Account and go to your dashboard.


Storenvy 101: Add Products to Storenvy


Today's post is brought to you by Megean of TheIndividuality.com. You can also find this post and more help posts on her blog. 

I love the simplicity of adding products to a Storenvy.com store. However, I know that it can be a little frightening to the new online shop owner. Here is a quick how-to to help you get started.

This tutorial focuses directly on adding a product. You will also need to set your shipping methods and collections (product categories). I do not cover these fully in this brief tutorial, but you can watch this video here to fully learn how to set up shipping.
Access to Shipping Rates table can be found at
https://ENTERYOURSHOP.storenvy.com/admin/shipping_classes
Access to Manage Your Collections can be found at
https://ENTERYOURSHOP.storenvy.com/admin/collections

*Blurred out sections contain information specific to my own online shop. If you have questions about these areas please feel free to contact me.

Step 1

Login into your Storenvy Account and go to your dashboard.
Follow this quick tip to go directly to the Products Tab of the Admin panel.

New Storenvy

I was one of the lucky few to get a sneak peek of the New Storenvy when it was in the works. And now that is is live, I can finally talk about how amazing it is!

First of all, New Storenvy focuses heavily on discovery - When you first join, you are given a choice of six collections and asked which ones you like. When you select your collections, you auto-follow Storenvy users who curate content specific to your tastes called influencers! The content influencers Envy (Storenvy's form of "liking" or "favoriting" a product) will show up on your home page, along with staff picks and suggested users based off of the other users you follow. You can "watch" stores so their new products are loaded directly into your stream, and you can follow your friends to keep up with what they Envy. My favorite part of the new home page is the continuous scroll. I could scroll for days and never get bored! There is also a dicey new feature - literally - in the lower right hand corner.


Roll the dice, and it loads a random product! Another amazing and fun time suck, I lost about an hour of my day playing with this feature when the New Storenvy launched.